You will need to follow these steps in order to be able to access OIDA data on SciServer.
First, set up an account on SciServer and request access to OIDA data:
- On SciServer’s login page, either create a new account tied to any email address you like, or use one of the Globus options. You will need to verify your email address by clicking a link in the automated message that you receive from [email protected].
- Send the username you chose when creating your account in an email to [email protected] to request access to OIDA through SciServer. You will need to wait for an OIDA project team member to approve your request within a few business days.
- Once an OIDA team member receives and acts on your request, log back into SciServer and accept the invitation to join the “OIDA” group: click on “Group” in the top navigation bar and click the green “Accept Invitation” button to join the group.
Next, create a compute container for working with OIDA data:
- When logged into SciServer, you are presented with the User Dashboard. Under SciServer Apps, click Compute (not “Compute Jobs”!) [direct link]
- Click Create Container.
- Give your container a name and choose the following options:
- Compute Image: Change to the latest version of “SciServer Essentials”.
- Data volumes: Check the box for OIDA.
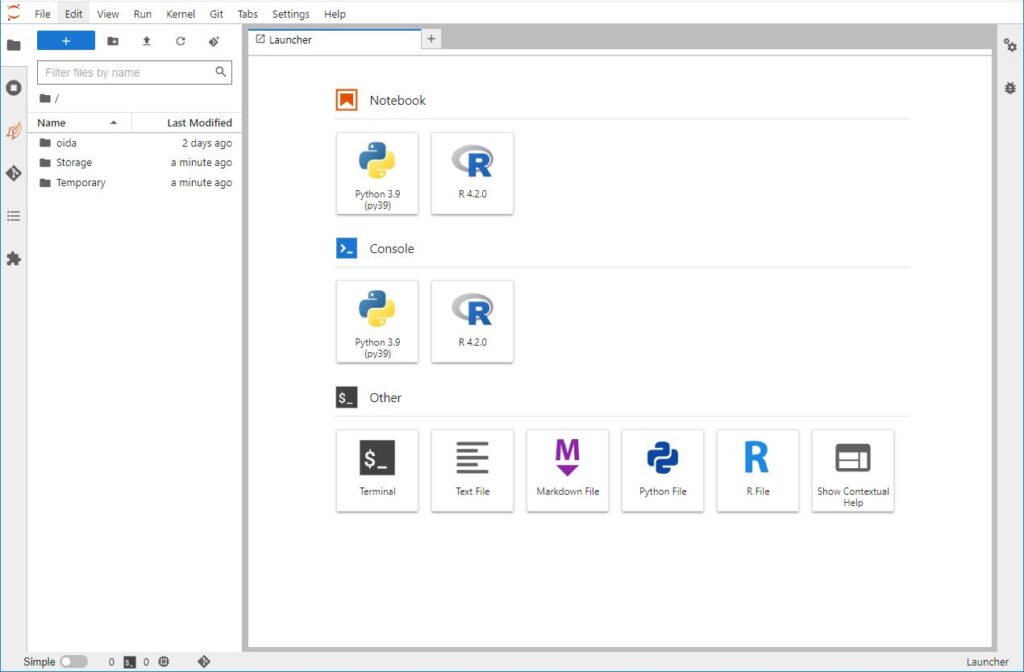
- Click Create. While the container is being created, it will have a status of “running”. Click on the name of your container to open it in SciServer’s JupyterLab interface. You should then see what’s below:

Once you are in the running container, the next step is to get the OIDA Toolbox’s sample Jupyter notebooks designed to help you become acquainted with working with OIDA data. Because the notebooks are shared among SciServer users, they are read-only; you will need to copy them to your user account so you can use and edit them. To copy the example notebooks (and some shared Python code) and work with them, follow these steps:
- In the list of files and directories in the left-hand column of the JupyterLab interface, open the oida folder, and then notebooks subfolder and OIDA Toolbox within that.
- Double-click on starthere.ipynb.
- Run the notebook by choosing Run > Restart Kernal and Run All Cells… from the menu, or by clicking on the “fast forward” button (two right-facing triangles) in the upper toolbar. You can track the progress of the running notebook by looking at the circle icon in the upper right: it will turn entirely white and stay that way when it’s done running.
- The starthere.ipynb notebook will copy all of the OIDA Toolbox Jupyter notebooks to a folder called “OIDA Toolbox” in your persistent directory.
- Now navigate to a new location in the JupyterLab interface—where the starthere.ipynb notebook copied the same notebooks. In the list of files and directories on the left side of the JupyterLab interface, click the folder icon just below the Filter files by name box and then navigate to your copy of the OIDA Toolbox in your persistent directory: /Storage/{your username}/persistent/OIDA Toolbox/.
- Each notebook (ending in .ipynb) contains instructions on how to edit and run it in order to query the OIDA data.
To return to the example notebook later:
- When logged into SciServer, click “Home” in the top navigation bar to visit the Dashboard. Under SciServer Apps”, click “Compute” [direct link].
- Click the name of your container. JupyterLab will open in a new tab.
- In the new tab, on the left, click “Storage”, then your username, and then “persistent”, then “OIDA Toolbox”. You will find your copies of the notebooks.

